Cylinders with images on them are quite common objects, but the image is usually such that you have to turn the cylinder round or move around it in order to see it. A flat image is simply wrapped around the cylinder. It is quite easy to put an image onto a cylinder so that if you look from the side you see the image as if you were looking onto an image as if it were on a plane.
Now, it is much easier to draw on a flat surface and roll the surface onto a cylinder. Since a soft drinks can is a standard size surface most of the following use that size to create the images. As with other anamorphic images, they are easier to draw using the grid method.
The basic geometry
This is a simplified method using a less complicated type of projection. It is called parallel projection and is as if the eye is an infinite way off so that all lines joining original points and their corresponding ones in the image form a set of parallel lines. It simplifies the geometry since distortion only occurs around the cylinder and not along the direction of the cylinder axis.
Anamorphic images for viewing from a definite eye point can be made, but working out distortions in two directions is complicated. In the diagrams, each is a view from above, with the viewer looking from the left.
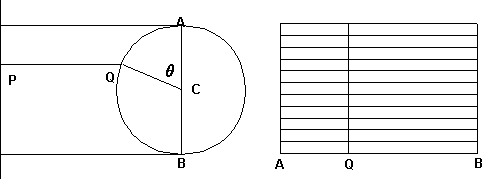 In the left diagram a point P lies on the picture which is the vertical line on the left. It is transferred to the cylinder at point Q, simply by drawing a line parallel to the direction of view. We want to draw a piece of paper which is wrapped around the cylinder, to fit over the arc AQB. In the unrolled anamorphic drawing as shown at the above right, the vertical spacing of lines remains equal. A vertical line which results as point Q appears at the position shown.
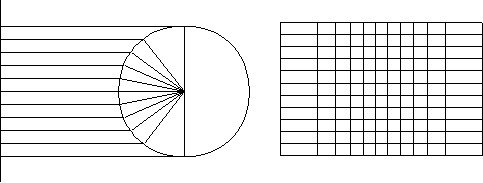
If the radius of the cylinder is r, then the arc length is r. Thus the resultant image is /2 times as wide as the original one when we unroll it. To find the position of Q on the resultant image we need to measure the angle and in the unrolled anamorphic drawing as shown at the above right, the distance AQ = AB/180 (if is measured in degrees). The results for an equally spaced square grid look like this:
Note how the lines are wider at the ends than they are in the middle. The reason for this is obvious in the projection diagram at the left.
Look at the picture below. The Maths Year 2000 logo has been made into an anamorphic image as above. However, it does not look too distorted until you look closely at it.
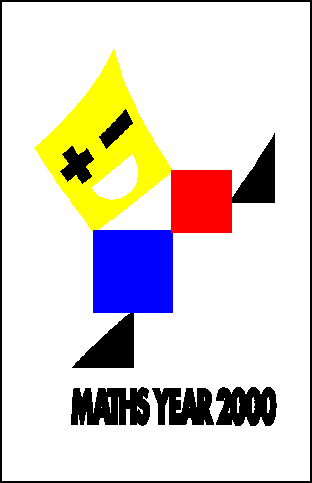
Note how the square for the head has lines which are curved, but the other squares are straight-sides because they are parallel to the sides of the box. They are, however, no longer squares.
Andrea Pozzo and the ceiling of St. Ignazio in Rome
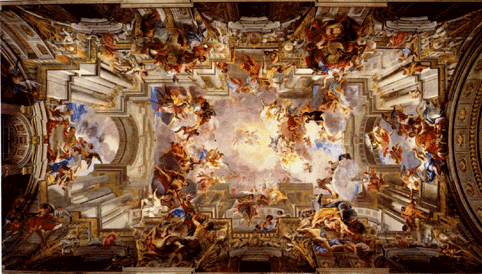
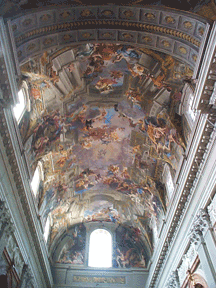
In the seventeenth century as mathematics advanced quickly, so did the study of perspective and this century was possibly the heyday of anamorphic art. One of the foremost artists was the Jesuit Andrea Pozzo. His most impressive work is in the Church of St Ignatius in Rome. (Ignatius Loyola was the founder of the Jesuits.) It took nearly ten years to complete from 1685-1694. This picture cannot hope to give more than an impression of the amazing work of art. It can only be experienced by being in the church.
The ceiling of the church is a huge vaulted half cylinder. The huge painting is an anamorphic representation of St Ignatius Loyola entering heaven. If you stand in the centre of the nave on the spot marked with a star, then you see the painting in its full glory. But if you move towards the door or the altar, then the columns appear to fall on top of you. Apart from being a superb piece of art, it must rank as the world’s best anamorphic painting.
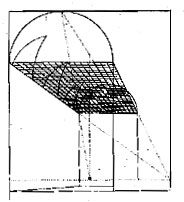
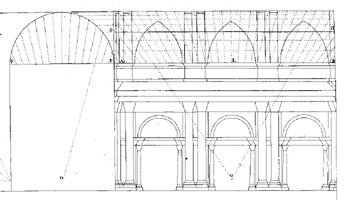
Pozzo describes how he made the painting in his book on architecture, which is available as a facsimile edition. He used a grid of string placed across the plane of the cross section of the half cylinder. He then attached a thread above the viewpoint on the ground and stretched it way up into the vault. Helped by a light under the fixing point to cast shadows of the grid, he drew the grid on the ceiling. He then used the grid in conjunction with detailed perspective drawings to create the painting.
This is a view of the ceiling, showing the half-cylinder shape:
But this is not the only anamorphic marvel in St Ignatius Church. For various reasons, including the fact that to build one would have blocked out the light to surrounding buildings, there is no cupola in the church. Instead, Pozzo painted one. He did this before painting the vault and it was his skill in producing a realistic representation of one that got him the commission to paint the vault. If you did not know it was a painting and just glanced up, you would think it was a real architectural object. Not only is the light and shadow realistic, but the viewing position is not that critical.
Anamorphic art at Vauxhall
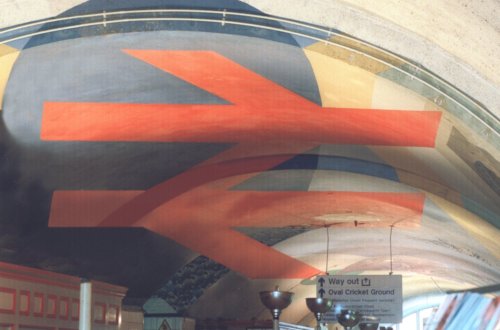
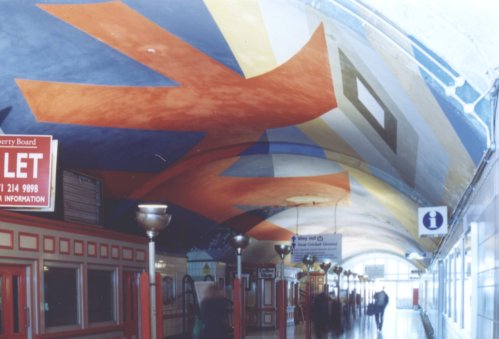
The Vauxhall Rail (not the underground) station in London, has an the entrance hall which is is a tunnel with a curved ceiling that used to have a series of anamorphic paintings on it. These were made by the artist William Pye. He drew the images on the ceiling by using a powerful slide projector. Unfortunately, Network Rail painted over them. Unless you stood and looked at just the right place (markers were on the floor), it is hard to make out what they were.
But if you are not in th ecorrect place, it looks like this:
Making your own anamorphic images
The download post below contains some anamorphic cylinder images to cut out and view.


How does one make design/layout a grid for an anomorphic drawing like the one ine th rail station? Especially if there are architectural elements that alter the surface (i.e.) on a wall and a ceiling, or on a flat sruface that becomes an arched surface?
Any help would be greatly appreciated.
Excellent info on the site, btw.
Thanks,
Veronica
Hi Veronica
The way people have done it in this case is to take a slide projector with the image and then draw it on.
That’s how William Pye did it at Vauxhall.
If you have a smooth cylinder you can build a grid like Pozzo did.
I suppose this would not be impossible with an irregular case.
It also depends on how you are creating the original image, too. I would design it so that the jutting out bits had no detail, so that it did not matter
I don’t know if it is clear that I have also set up a discussion group at http://anamorphosis.grouply.com/.
Hope that helps, or send more specific details
Hi, I teach HS drawing. I’m wondering if there is a simple grid that I could print for kids to draw an object onto. I would give them the normal grid but then they would redraw the object onto the anamorphic grid. I don’t have a lot of time to experiment but maybe I have to for this to work. Thanks